How much solar & battery do you actually need?
There are two ways to size your solar panels and battery — one quick and conservative, one smarter and cheaper. Use our free tool now to try both.
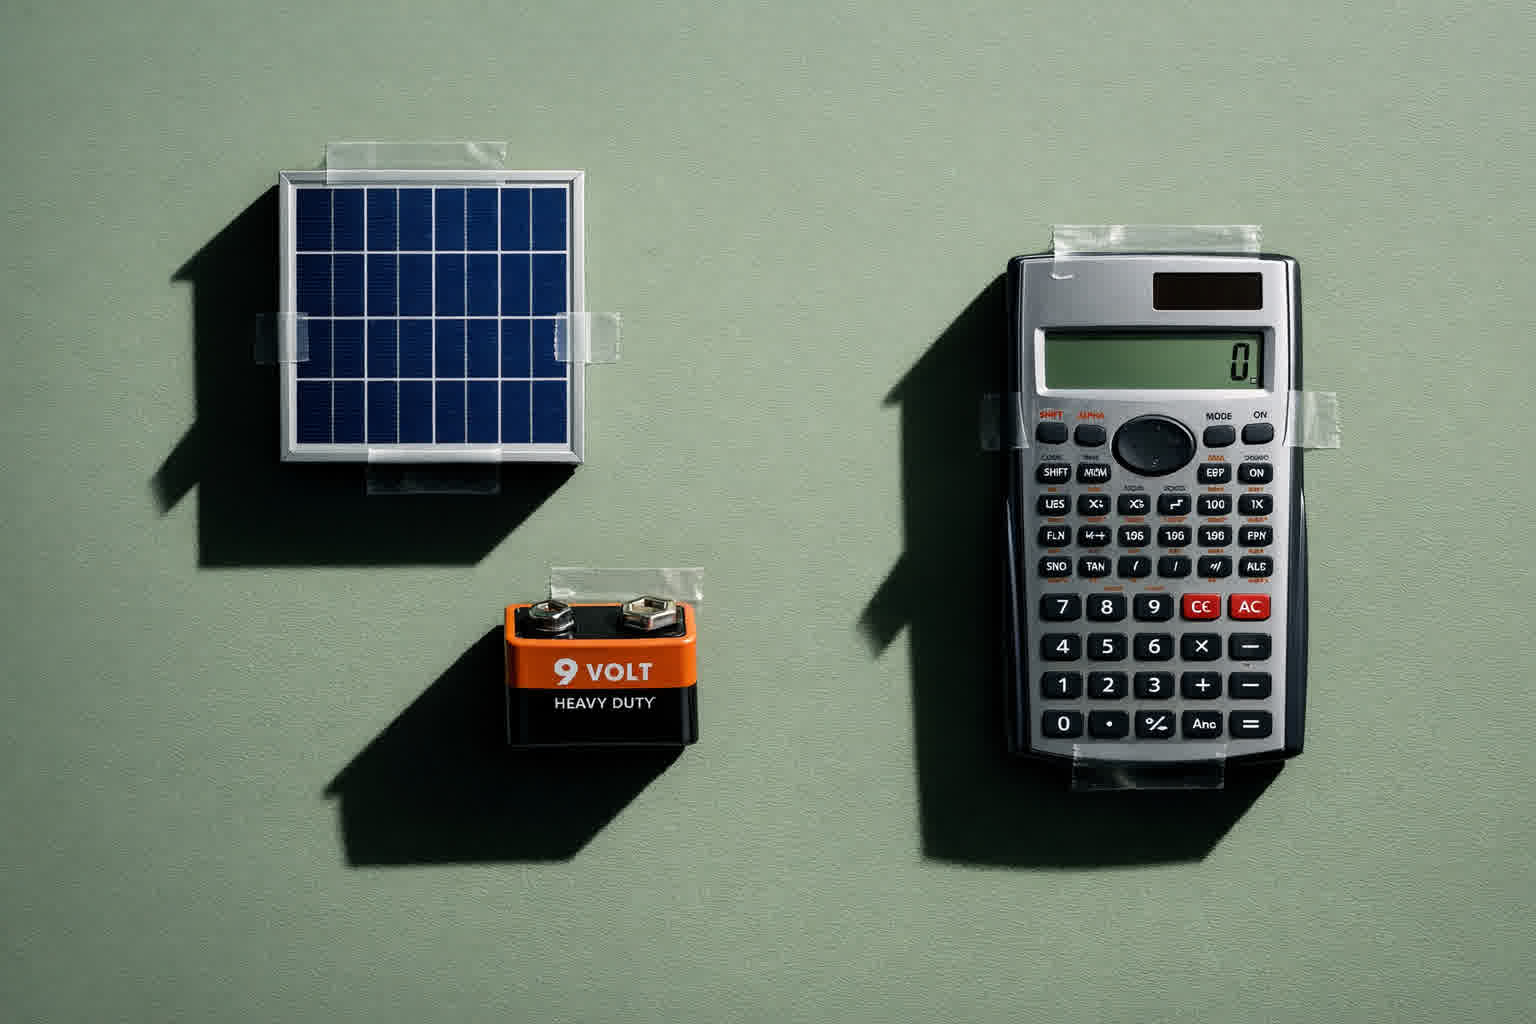
Here's a situation. You're trying to power your home with the sun. You did some research on DIY solar power systems, and landed on some heavy electrical engineering terms: monocrystalline photovoltaic panel, LiFePO4 battery, sine-wave inverter, MPPT charge controller... At this point, you'd rather call up an installation service company to make your life easier.
If you're like most people, it's smart to leave the engineering to the experts.
But you should be an expert in one thing — your own power consumption pattern. If you don't understand your load, the experts will design a system for you. And they have every incentive to oversize it. You'd pay for capacity you won't need, a classic beginner's mistake.
This article walks through two approaches to sizing the two biggest line items of any solar system — solar panels and battery. One approach is simpler, but tends to oversize your system. The other takes a bit of learning, but it'll end up saving you some money.
There's an interactive tool embedded below that does both calculations instantly. Let's start with what you actually need to figure out yourself.
Know your consumption patterns
Before any sizing math, you need to know how much electricity you actually use, and when.
We recommend taking a few weeks to study your consumption. A simple wattmeter (Rp 150,000 on Tokopedia) plugged between your appliance and the wall outlet tells you everything you need. For each appliance, you just need two numbers from it — total energy consumed and hours measured. Together, they tell you the average power of an appliance.
Average power (kW) = Total energy consumed (kWh) ÷ Hours measured
That's it. Do this for your AC, your refrigerator, your lights, your water pump. Then go to the tool and tap Start > + Add Load > Name the appliance, the average power (in Watts), and the time of usage.
What's that? It's cumbersome to list each and every appliance into this tool? Hit the Add examples button to pre-fill some of the most common household appliances. Tap on each card to edit the actual usage data.
For the rest of this article, we'll use a simplified example of household loads, to get the point across:
- AC running 9 AM to 4 PM: 1,200W
- Refrigerator, always on: 150W
- Lights, 5 PM to 10 PM: 300W
Total daily consumption: 13.5 kWh. We'll use this as our running example.
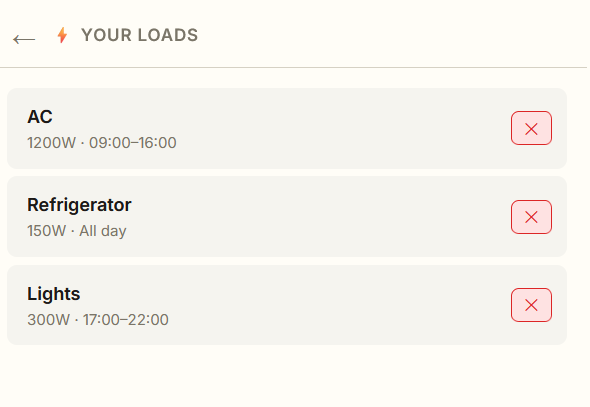
ℹ️ If you ever accidentally exit out of this page, don't worry. The load inputs are saved in your browser, so you'll see them again after a refresh. Just don't delete your history.
Method 1: Simple mode — the conservative approach
The simplest way to size a solar system uses a clean mental model:
- The battery powers everything you need for the day. Sum up all the electricity your appliances consume in 24 hours.
- The battery must be recharged when the sun is out. Sunlight is usable for roughly 4–5 peak sun hours (PSH) in Indonesia.
- Panels must be large enough to recharge the battery within that window.
Here's the math, it's simpler than you think:
Panel (Wp)  = Daily Load (Wh) ÷ PSH ÷ System Efficiency
Battery (Wh) = Daily Load (Wh) × Autonomy Days ÷ Depth of Discharge
By default, the tool sets conservative estimates for PSH and system efficiency. The system is also sized for 0 autonomy days by default, and a depth of discharge of 80% at 24 V. If you're curious about those default numbers, head over to the footnote on default parameters below.
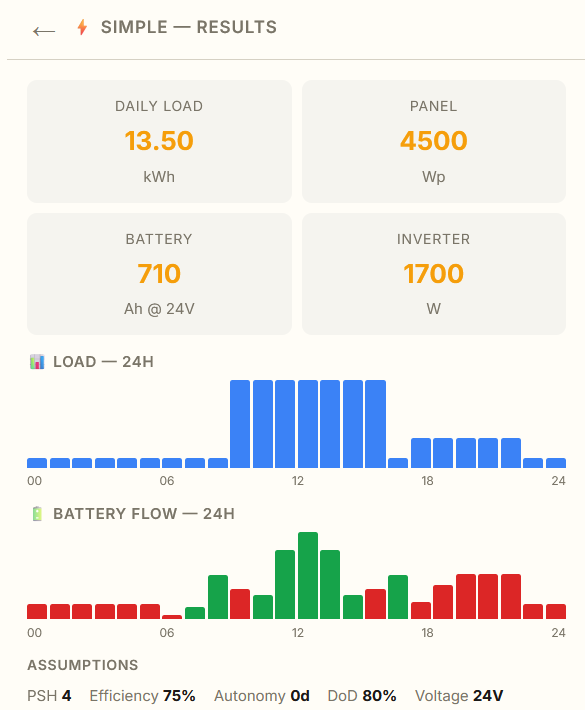
As you can see, the simulator sizes for your panel and battery instantly. In Simple mode, you get four numbers:
- Daily Load — your total energy consumption in kWh. This is the number everything else derives from.
- Panel — the recommended size in Wp (watts-peak). For our 13.5 kWh example with 4 PSH and 75% system efficiency: 13,500 ÷ 4 ÷ 0.75 = 4,500 Wp.
- Battery — sized for your full daily load. At 80% depth of discharge (LiFePO4 standard): 13,500 ÷ 0.8 = 16,875 Wh (703 Ah). The tool rounds up to the nearest commercially available size: 710 Ah (17,040 Wh) at 24V.
- Inverter — sized for your peak simultaneous load. In our example, AC + fridge run together at 1,350W, so with a 1.25 safety factor: 1,700W.
Two charts add context. The Load chart shows your 24-hour demand pattern. The Battery Flow chart shows when the battery is charging (green) or discharging (red).
Simple mode is conservative by design. It assumes that your loads are disconnected from the solar panels, and the battery must carry everything.
Technically, in this system design, your battery will always have excess power, which can be a good thing if you need backup. But you'll pay for a battery that's larger than what you might actually need.
Method 2: Smart mode — the optimized approach
Excess power is good, right? Yes, but at the time of writing, batteries are still quite expensive. At current prices, they often cost more than the panels themselves. If you can size your battery for only the power you need at night, you save money.
The real model of how a solar system works is more nuanced than Simple mode assumes:
| At a given hour... | Power flows |
|---|---|
| Daytime with excess solar power | Panels → Load + Battery (charging) |
| Daytime with insufficient solar power | Panels + Battery → Load (discharging) |
| Nighttime | Battery → Load |
During the day, solar feeds your loads first. Battery charging is what happens with leftover power. So, this is the model that professional solar designers use. And it's what Smart mode simulates.
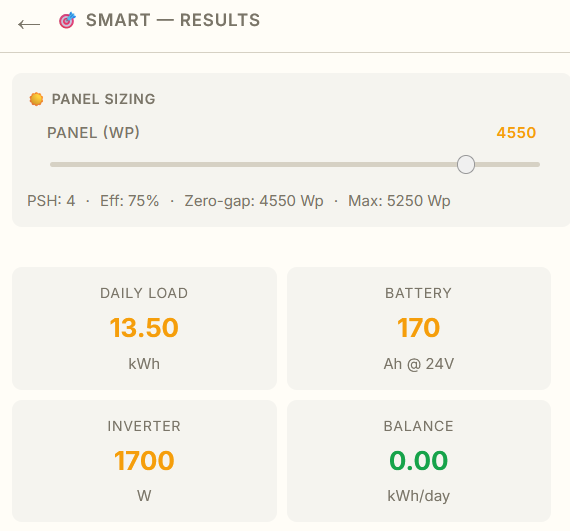
When you select Smart mode, the tool runs an hour-by-hour simulation of your loads against a solar production curve. It finds the smallest panel size where total generation equals total consumption over a full day, a.k.a. the zero-gap point.
Here's where it gets interesting: both modes arrive at the same panel size. For our example case:
| Simple | Smart | |
|---|---|---|
| Panel | 4,500 Wp | 4,500 Wp (same) |
| Battery | 16,875 Wh (710 Ah rounded) | 170 Ah (not a typo) |
| Inverter | 1,700W | 1,700W (same) |
The panel sizing is identical because both methods solve the same fundamental equation: total supply over a 24-hour cycle must equal total demand. More panels won't let you use more energy at night; the battery is the bottleneck for this.
Where Smart mode saves money is in the battery. Instead of sizing it for your full day's consumption, it sizes it for the actual swing between your deepest discharge point and your fullest charge point.
The battery is still large enough to cycle cleanly from 20% charge at dawn to 100% at dusk, but consequently there is not much margin for storing excess power.
But that's the whole point. We want to know the absolute minimum size required for the system to work properly. You can then add a safety margin on top of it, if you want.
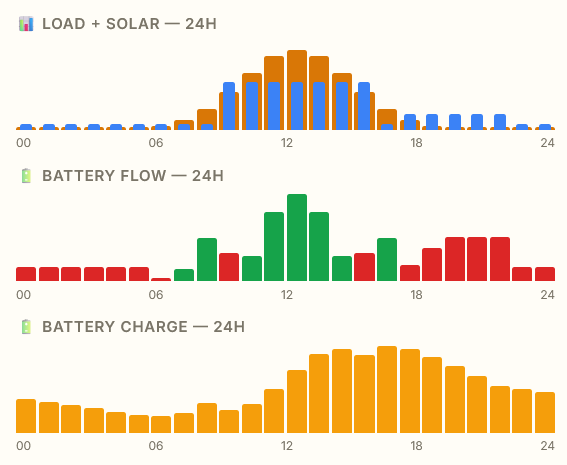
Also, the charts in Smart mode are more informative:
- Load + Solar — 24h: See exactly when your demand overlaps with solar production and when it doesn't.
- Battery Flow: Green bars show surplus going into the battery, red bars show the battery discharging to cover deficits.
- Battery Charge: The SoC curve shows your battery cycling from 20% at dawn to 100% at dusk — a complete daily cycle.
Unlock a bonus "no-battery" feature
Let's suppose you have zero load at nighttime. You only consume power during the day. Suppose it's a machine that needs 1000 W and runs continuously from 9 AM to 3 PM.
Question: What is the minimum size of the solar panels so that daytime solar power covers the load completely, that you technically won't need a battery?
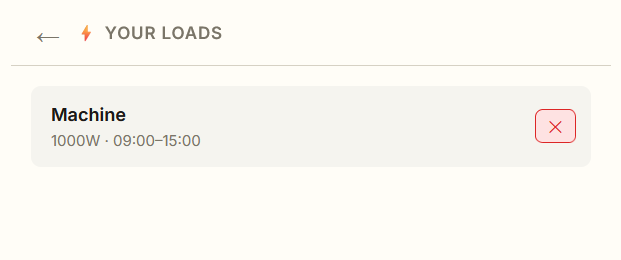
Enter one load like in the screenshot, and the result in Smart mode reveals a theoretical "Battery-free" panel size at 4950 Wp.
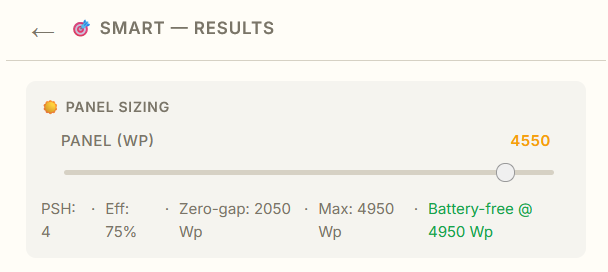
Is this realistic? Not quite, but it's fun to ponder.
In real life, many grid-connected industrial rooftop installations are set up so that the panels reduce some daytime consumption, but the system can draw power from the grid if needed.
Which method should you use?
| Situation | Use |
|---|---|
| You want a quick, conservative spec | Simple |
| You want to minimize battery cost | Smart |
| Your loads are mostly daytime | Smart (may eliminate battery entirely) |
| You need multiple days of backup | Simple (autonomy days) |
| You're designing for a factory or business | Smart |
Simple mode is safer — it gives you a battery big enough for your full daily consumption, plus you can add autonomy days for cloud cover. Smart mode is cheaper — it sizes the battery to the actual deficit, not the full load.
For most homeowners, the answer is somewhere in the middle. Use Smart mode to understand your true battery requirement. If the savings are significant, design around that number. If you want peace of mind, round up.
The tool above lets you toggle between both approaches with the same load data. Try it with your own numbers, see where the savings land, and decide what makes sense for your situation.
A note on the default parameters
If you're curious why the defaults are what they are:
Peak Sun Hours (PSH) — 4.0
PSH measures the equivalent number of hours per day where solar irradiance averages 1,000 W/m². Indonesia's solar irradiation ranges from 3.6 to 6.0 kWh/m²/day depending on region — equivalent to 3.6–6.0 PSH (World Bank / Solargis, 2017). Western Indonesia (Jakarta, Sumatra) sits at the lower end around 4.0, while eastern islands can reach 5.5. Setting it at 4.0 is a conservative Jakarta baseline. The Global Solar Atlas puts Jakarta's specific PV output at 1,320 kWh/kWp annually — that's about 3.6 daily PSH, so 4.0 is actually slightly optimistic for Jakarta itself. Your mileage varies by location.
System efficiency — 0.75 (75%)
Not all the sunlight hitting your panel turns into AC power at your outlet. Losses stack up: inverter conversion (4%), battery round-trip (10%), wiring resistance, soiling on the panels, temperature derating. NREL's PVWatts V1 used a default DC-to-AC derate factor of 0.77; PVWatts V5 switched to a 14% system loss default plus separate inverter efficiency, which works out to a similar net derate (NREL/DOE, 2014). Our 0.75 accounts for additional off-grid losses (battery cycling, deeper wiring runs) that grid-tied PVWatts doesn't include. It's a safe, real-world estimate for a well-installed LiFePO₄ system.
Autonomy days — 0
Autonomy days determine how many days the battery can run your loads without solar input. Defaulting to 0 means the battery is sized for daily cycling only — it's expected to recharge fully the next sunny day. If you live somewhere with frequent multi-day overcast weather, bump this to 1 or 1.5.
Depth of Discharge — 80%
LiFePO₄ batteries can be discharged to 80% of their rated capacity without significant cycle life degradation. At 80% DoD, typical cycle life is 4,000–6,000 cycles before capacity drops to 80% of original — roughly 11–16 years of daily cycling (Anern, 2026). Lead-acid batteries would be limited to 50% DoD. Since the tool assumes LiFePO₄ (the dominant chemistry for new solar installations), 80% is the standard.
System voltage — 24V
24V is the most common voltage for residential off-grid and hybrid systems. 12V is limited to small setups (cabins, RVs). 48V is used for larger installations (above 5 kW). The tool uses 24V as a middle-ground default.